Being a Mac user, I got to face different problems, especially with audio capturing. For a long time, I also used to search on Google and Youtube “Discord screen share no audio Mac” or “Discord screen share audio not working on Mac”. But most of the results were used to be Windows centered. I tried different third-party applications. Out of which some of them worked, some of them asked for a premium license key. And after complete research, Finally, I have come up with some easy and working ways to fix this problem 😇. This article is not only for Mac users but also for Windows users. So If you want to know how to share audio on Discord screen share, then read this article till the end.
Tip: If you can’t hear anyone on Discord, not only while screen sharing but generally, then have a look at this article.
Table of Contents
What Causes Discord Screen Share No Audio Problem?
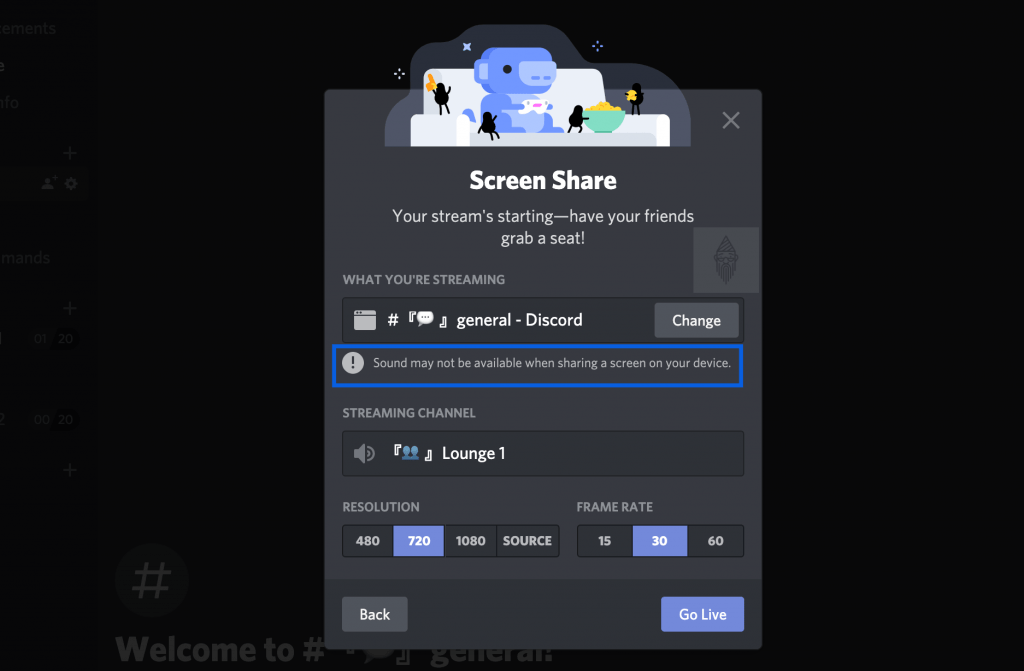
This is a very common problem with a Mac user. Whenever you click on the “share your screen” button in the Discord app in your Macbook. There is specifically written, “Sound may not be available when sharing a screen on your device” because Mac doesn’t allow you to capture desktop audio. And other few possible reasons for Discord streaming no sound in both Windows and Mac are the following:
- Faulty Audio Drivers: One of the most common reasons behind Discord not sharing audio can be the faulty audio drivers. Discord also makes use of the audio drivers for sharing audio. And if they get corrupt, then this can result in a problem.
- Administrative Access: Discord might require administrative access to your device as it streams your entire screen remotely to other devices. Discord screen share no audio problem can be solved by granting administrative access.
- Outdated Version: An outdated version is possible to cause Discord screen share audio not working issue. Also, keeping an outdated version can compromise security. So keep Discord up-to-date.
Now, let’s look into the solutions. The solutions for Discord screen share audio not working is divided into two parts: one for macOS users and another for Windows users. So, firstly let’s look into hacks for MacOS users.
Solutions: Discord Screen Share Audio Not Working [macOS]
Here I have mentioned three ways, one is the basic, and the other two are using third-party software. Now, let’s into the primary method.
Tip: Do you know how to record Discord audio? If not, then check this article out.
The Basic Method:
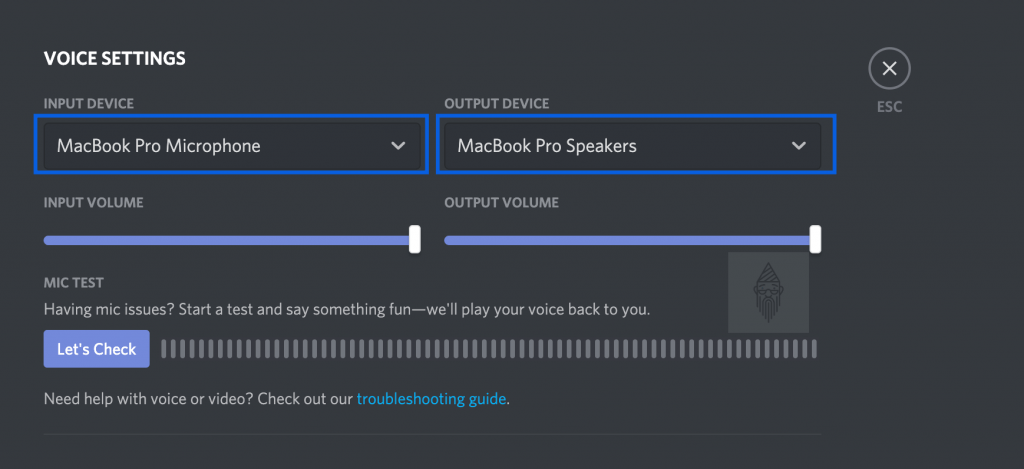
In this method, what one can do is, he can set Discord’s Voice Settings to the built-in MacBook Microphone as Input & built-in MacBook Speakers as Output Device. So when one is streaming, the built-in microphone will capture the sound from the speakers. Yeah, I know, the sound will lag a bit and might be not that much clear. But it’s just a workaround. Before knowing the other two methods, I used this method for temporary purposes. You can give it a try or simply move to the second method.
Using LoopBack Audio (Quick + Premium):
This is one of the best methods as it doesn’t require many changes in Settings. For this, firstly, you need to download LoopBack audio on your Mac. Further, you need to follow the steps given below.
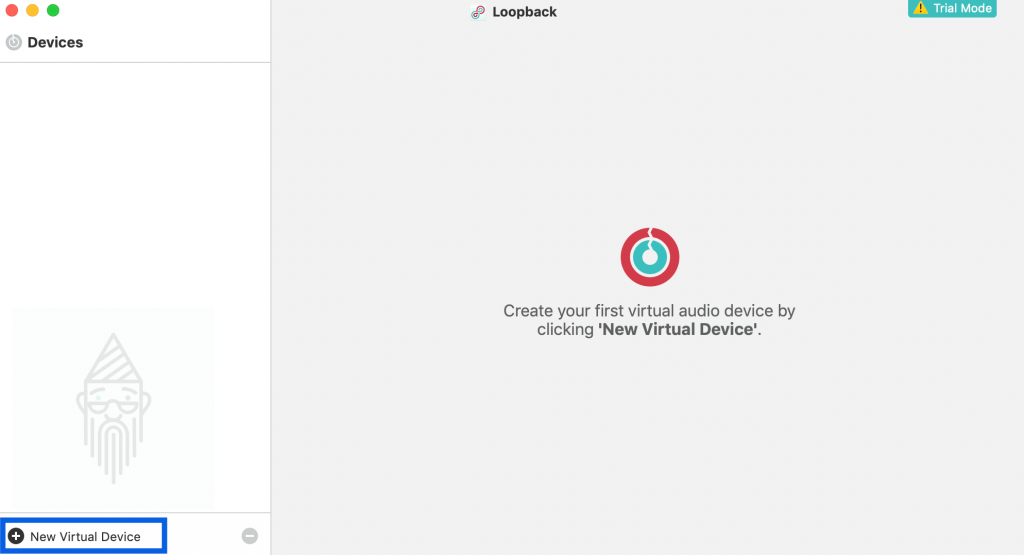
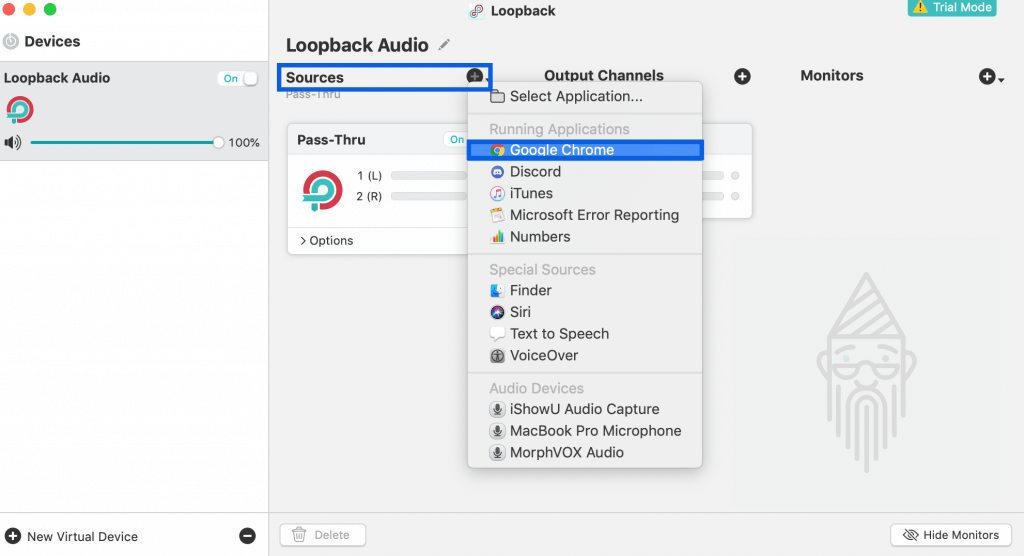
- Open LoopBack Audio, and add a new virtual device by clicking on the + sign.
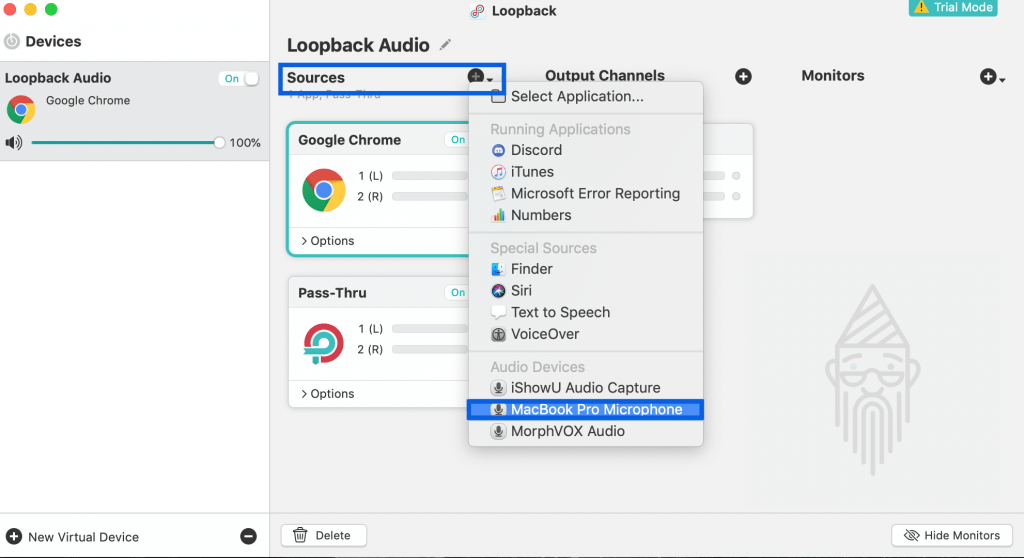
- Now, add two new sources. One would be the stream source (Here, I am adding Google Chrome). The other one can be the built-in MacBook microphone or your external earphones mic (Here, I am using the built-in Microphone).
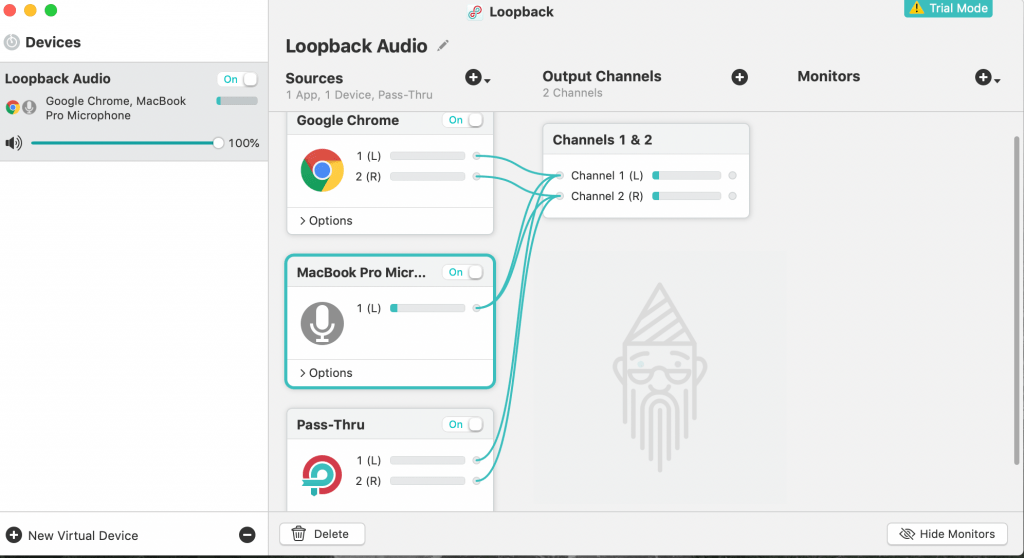
- The Output Channels need to remain unchanged here.
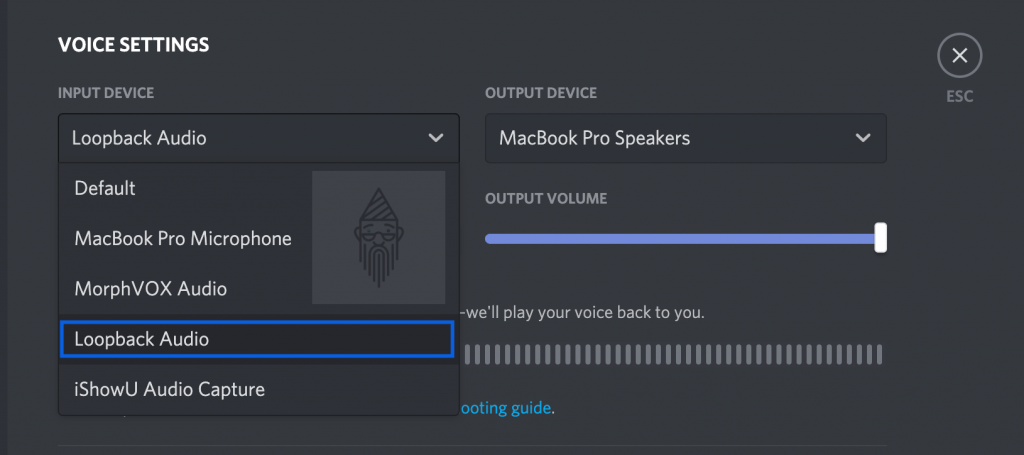
- Now, It’s time to make a change in Discord Voice Settings. Change the Input Device to LoopBack Audio. And set the Output Device according to your requirement. That’s it.
- Now, try streaming and enjoy!
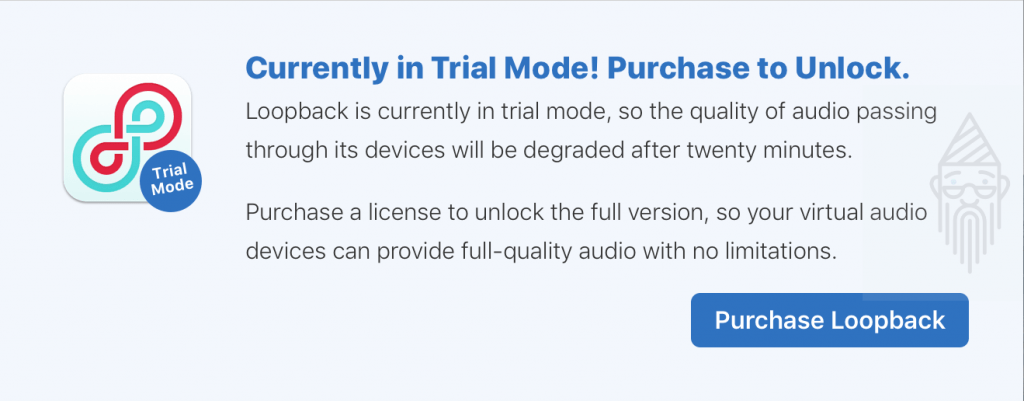
Moreover, this method also works flawlessly for playing only audio in the voice chat without any noise or lag. But the limitation of this software is that its trial mode provides you only twenty minutes of quality sound. After the end of the trial mode, either you need to upgrade it to the premium version, or you need to operate it with degraded audio quality.
Tip: Here’s a complete guide for those who don’t know how to cross out words in Discord: Discord Strikethrough.
Using iShowU Audio Capture (Free):
This is also one of the most fantastic methods which even I currently use while streaming on Discord. Setting up for Discord screen share audio is a bit lengthy process. So let’s begin with the process:
- Firstly download iShowU Audio Capture, which lets you convert your device’s audio output into the audio input.
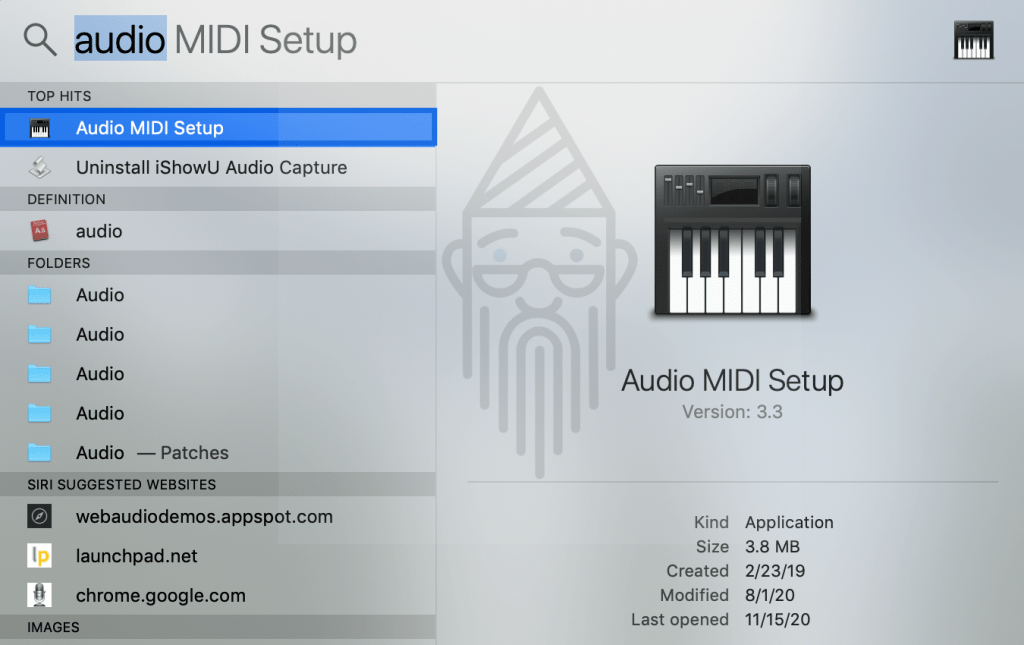
- Now open Audio MIDI Setup. You can use the Spotlight Search to find it easily.
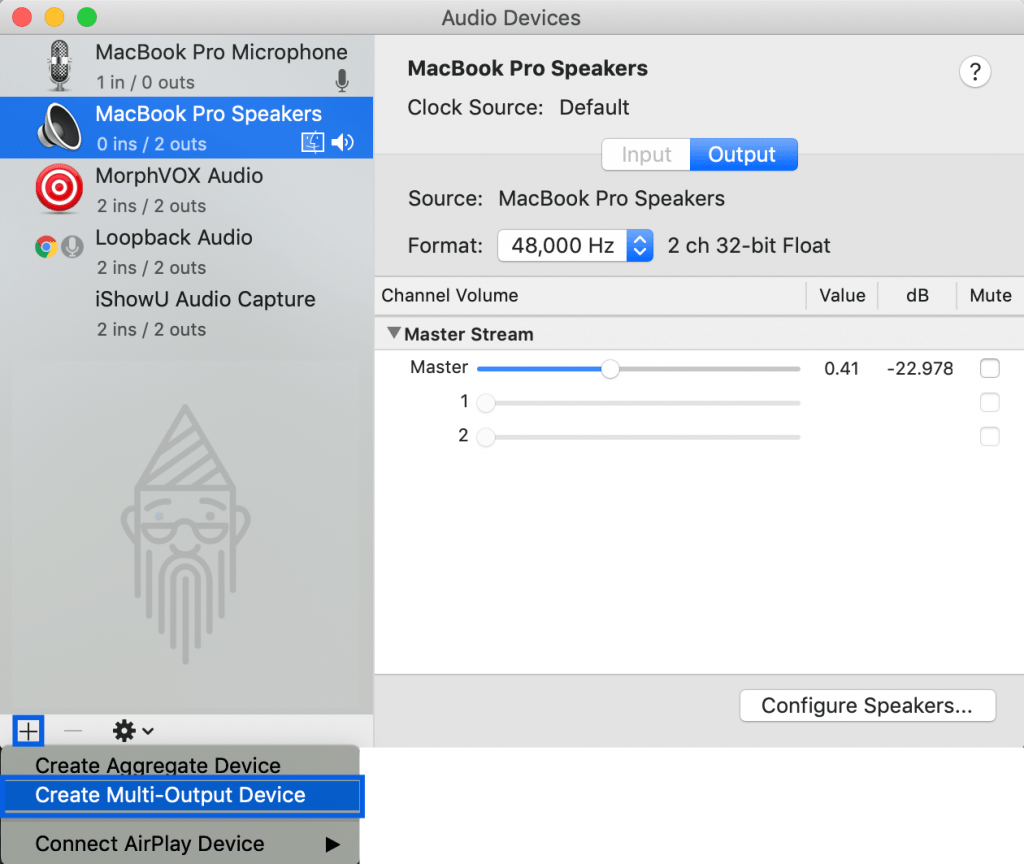
- Now click on the + sign and tap on the Create Multi-Output Device option.
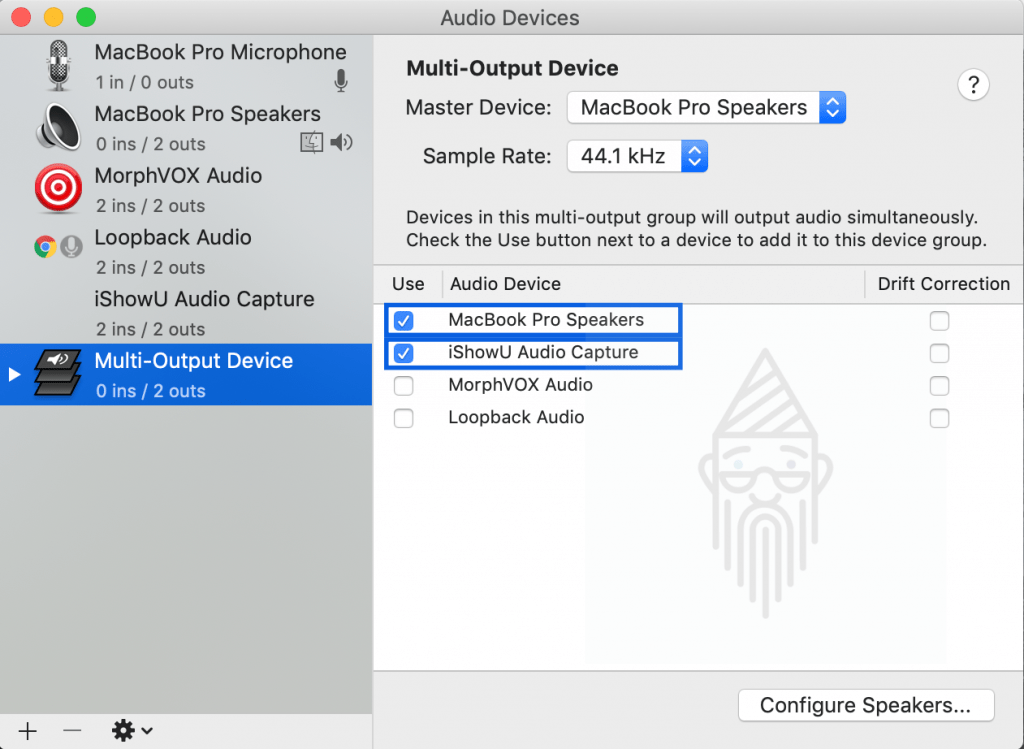
- Select built-in MacBook Speakers and iShowU Audio Capture.
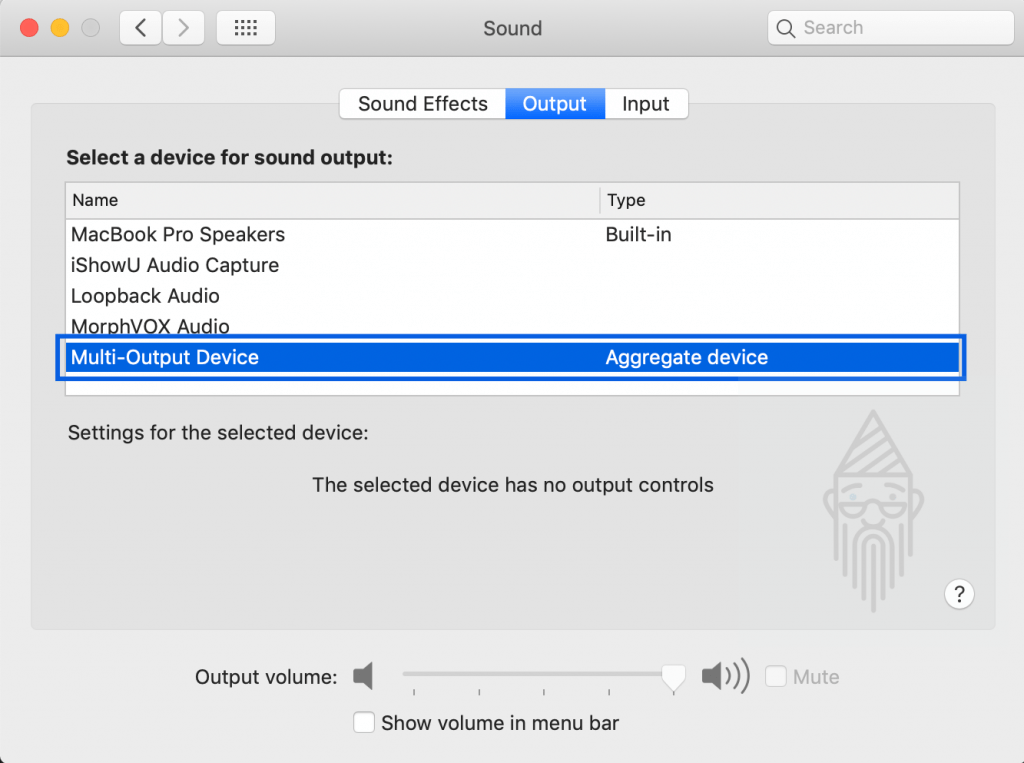
- Now open the Sound Settings of your device and set Multi-Output Device as Output.
Note: To make a Multi-Input Device, again, we need to use a workaround. For that, here we will be using GarageBand, which comes pre-installed in Macbook.
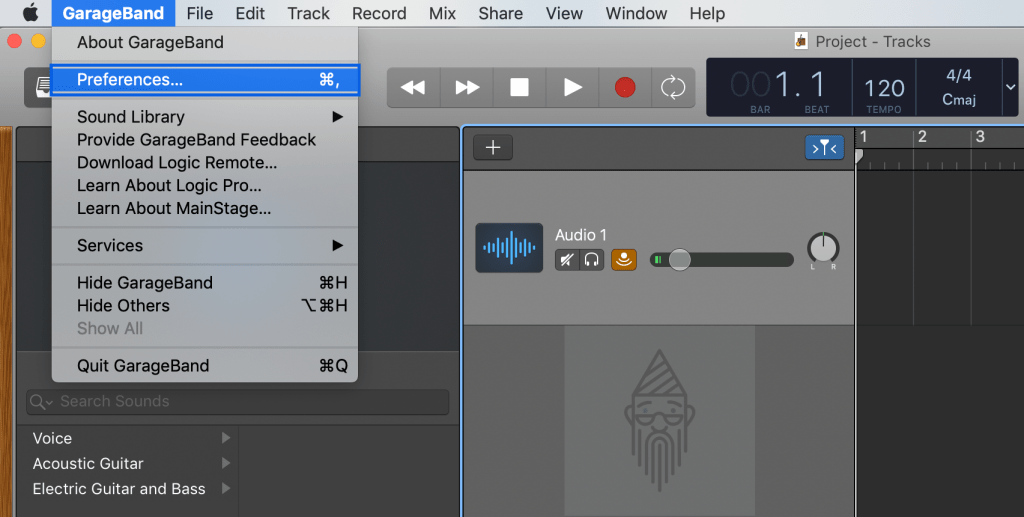
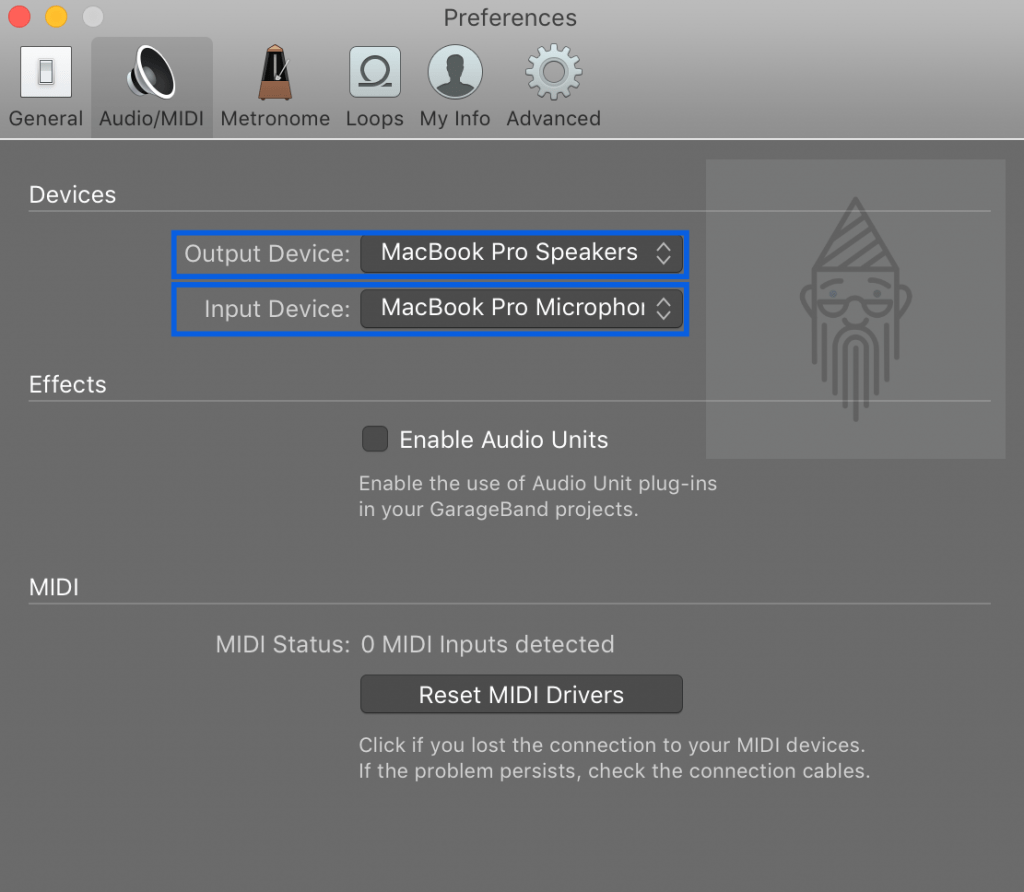
- Now open GarageBand and go into the Preferences and then Audio/MIDI. For now, set the built-in MackBook Speakers as Output and built-in MacBook Microphone as Input Device.
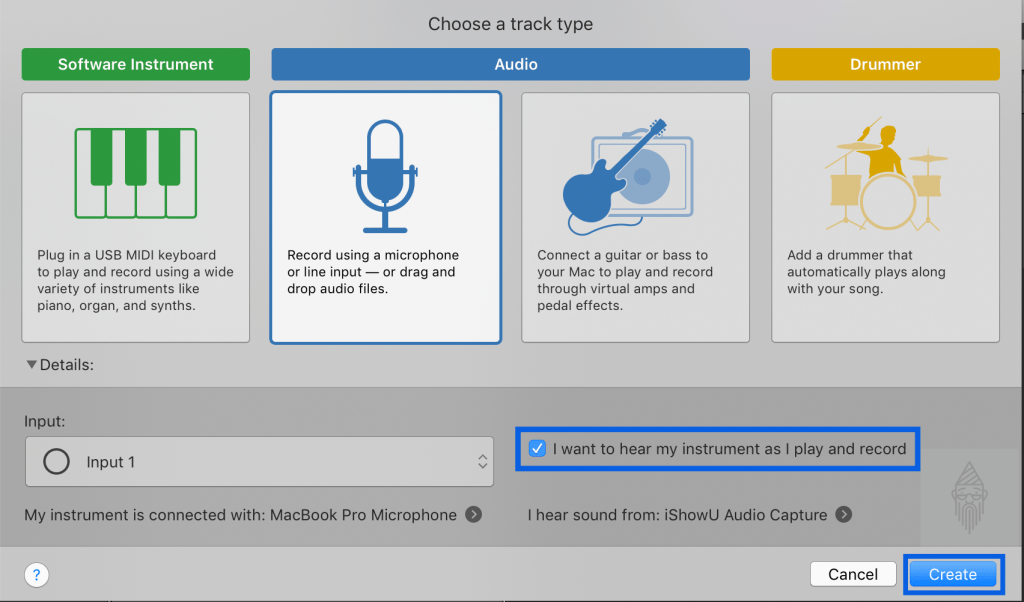
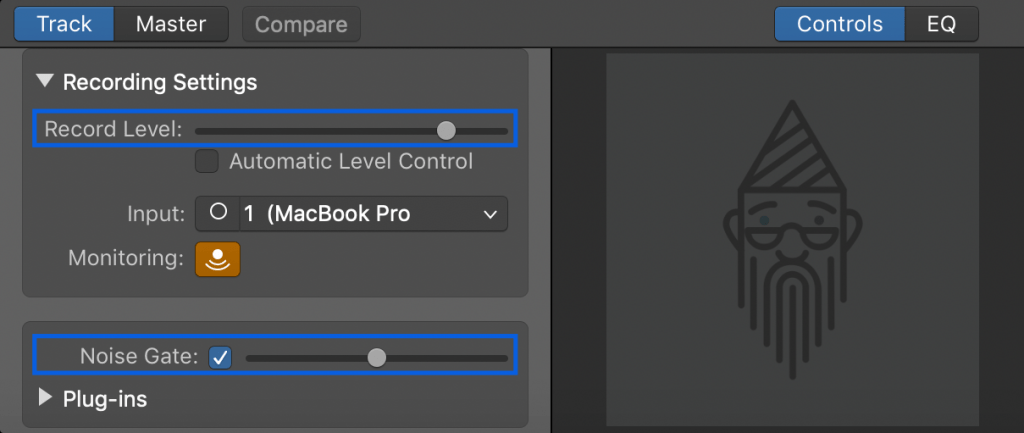
- Now create a new audio track and make sure “I want to hear my instrument as I play and record” is ticked. Further, adjust the Recording Settings by turning up the Record Level. Also, to eliminate background noise, tick the Noise Gate.
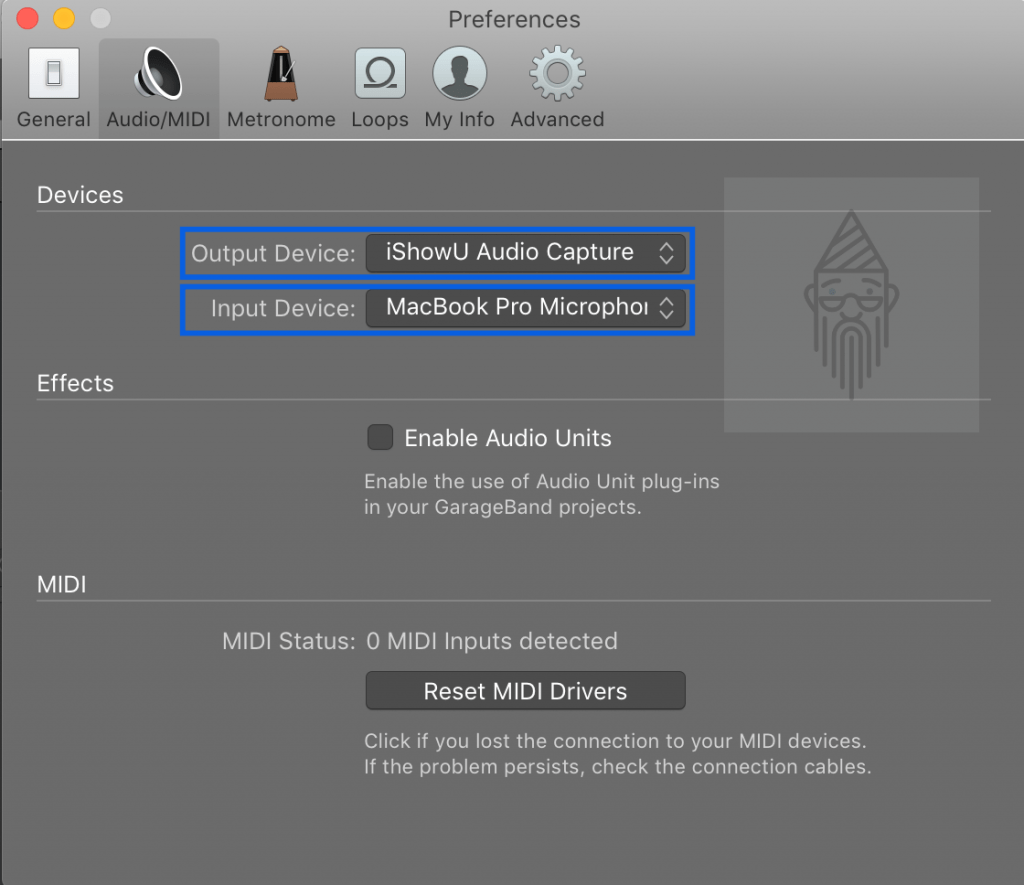
- Afterward, go back into the Preferences and then Audio/MIDI. Now set iShowU Audio Capture as the Output and built-in MacBook Microphone as Input Device.
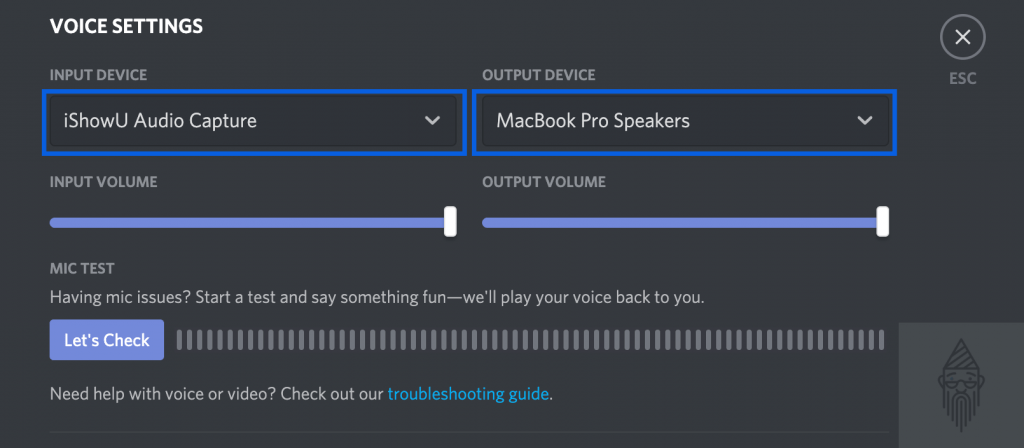
- Now at the time of sharing audio, go into the Discord Voice Settings. Set the iShowU Audio Capture as Input Device and built-in MacBook Microphone as Output Device. Also, set the input sensitivity to be very low as you are already handling it using another application.
Whenever you are done with screen sharing, and you want to restrict discord screen share audio, simply revert the changes. That’s it.
I think the above two workarounds around are best for you. Now let’s look into solutions for Windows users.
Solutions: Discord Screen Share Audio Not Working [Windows]
Whenever I use my Windows device for screen sharing on Discord, it works well. But if it shows an audio problem during screen sharing, I use the hacks mentioned below:
Tip: Check out this guide on how to make roles in a Discord server. I hope this will help you.
The Basics:
Before moving into the main methods, try out some basic methods:
- Restarting your device: Some of the applications running on your Windows device’s background can cause problems with Discord. So you can try restarting your computer and check if it is fixed or not using the screen sharing option.
- Clearing Discord Cache: Clearing Discord Roaming Data can also help you tackle this issue.
- Updating/Reinstalling Discord: Updating Discord may fix the bugs, which might cause audio problems while sharing screen. But If you are already using the latest version, you can try reinstalling it.
By Adding Your Activity:
Discord comes with a feature that lets you add your current activity. You can use it to solve this issue. Simply follow the steps given below:
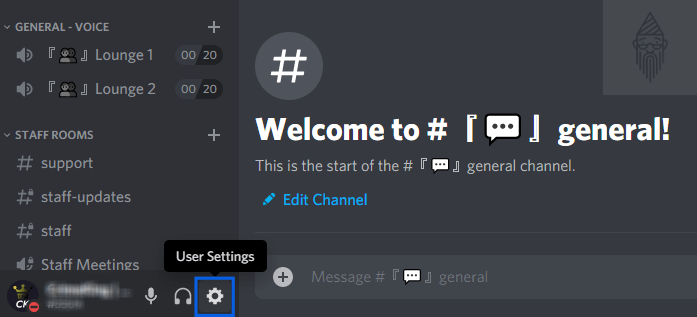
- Firstly, click on the gear-like icon to open User Settings.
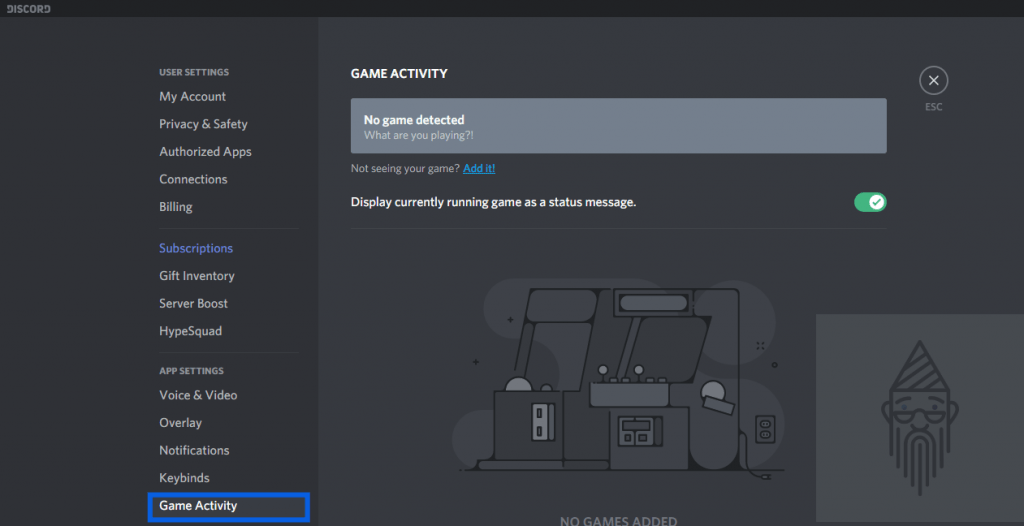
- Then under the App Settings menu present in the left sidebar, tap on the Game Activity option.
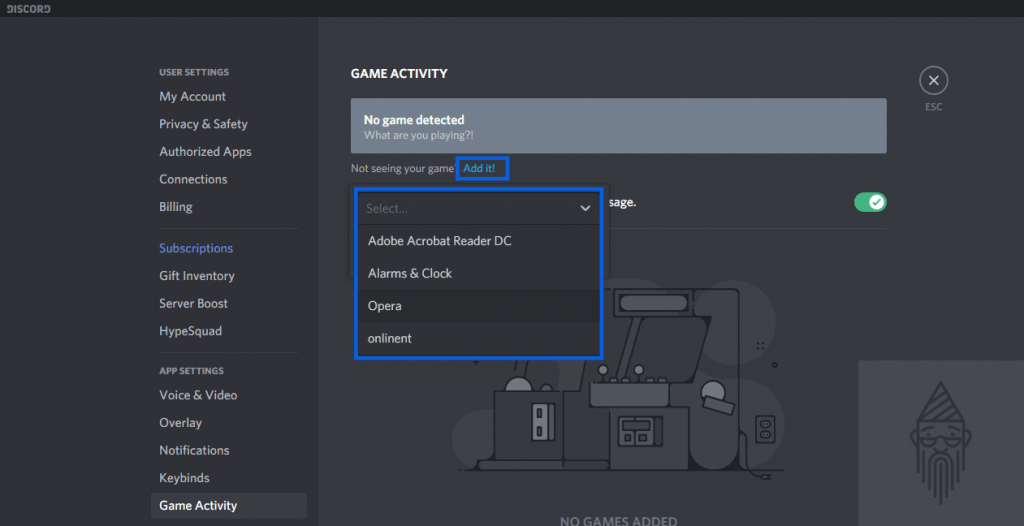
- Now click on the “Add it!” button to add your activity. Also, make sure the overlay is kept on.
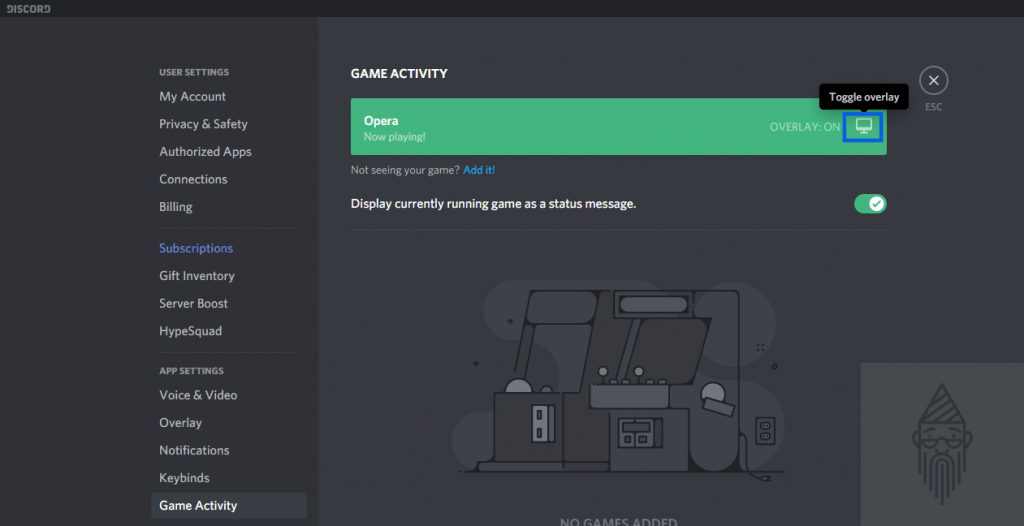
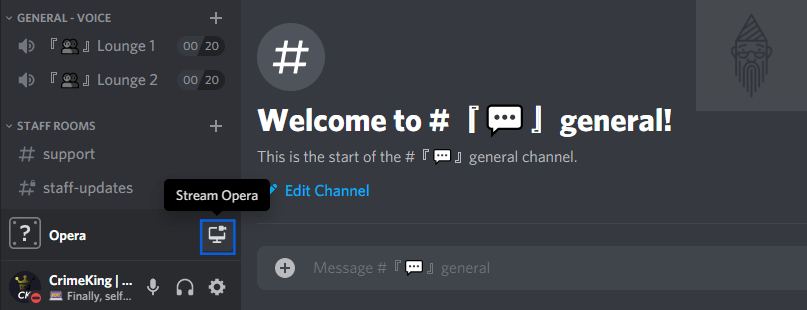
- Now when you escape, you will get to see an option just above your username to Stream your Game Activity. You can use it for streaming. I hope this method fixes the problem of discord streaming no sound.
Reinstall Audio Drivers:
Audio drivers are significant components that connect the hardware on your device with the OS (Operating System) and its applications. Therefore faulty or outdated audio drivers can be one reason behind this Discord screen share audio not working issue. I have mentioned the steps to reinstall the audio drivers in one of my articles. Check it out.
Resetting Voice Settings In Discord:
One of the reasons behind this problem can be improper Discord’s voice settings. You might have altered them recently. After which it started causing this issue. So you can try resetting the voice settings by following the steps given below:
- Firstly open the User Settings like we previously did.
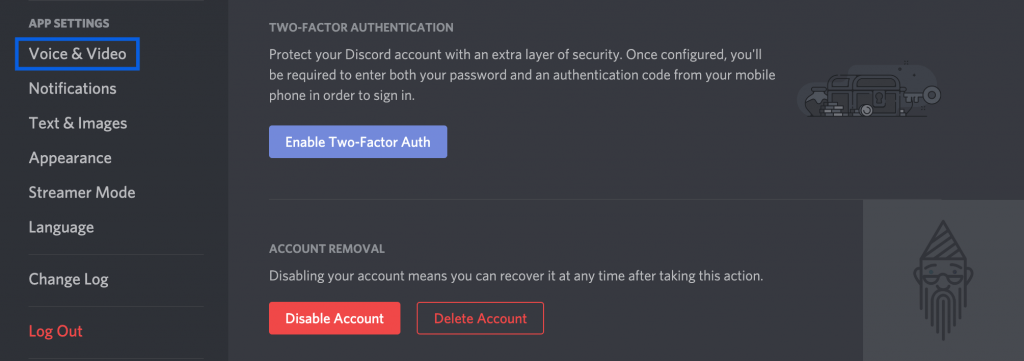
- Under the App Settings menu present in the left sidebar, tap on the Voice & Video option.

- Now scroll down till the end. There you will find an option with the name “Reset Voice Settings“. Just click on it.
Tip: Those who want to know how to use text to speech on Discord can refer to this blog post.
I hope this article will help you. Still, If you have any queries or you want to suggest some other method. Then you can write to me through comments. I will surely look into it as soon as possible.
![Discord Screen Share No Audio [Problem Solved]](https://www.techtoogle.com/wp-content/uploads/2020/11/Discord-Screen-Share-No-Audio.jpg)

